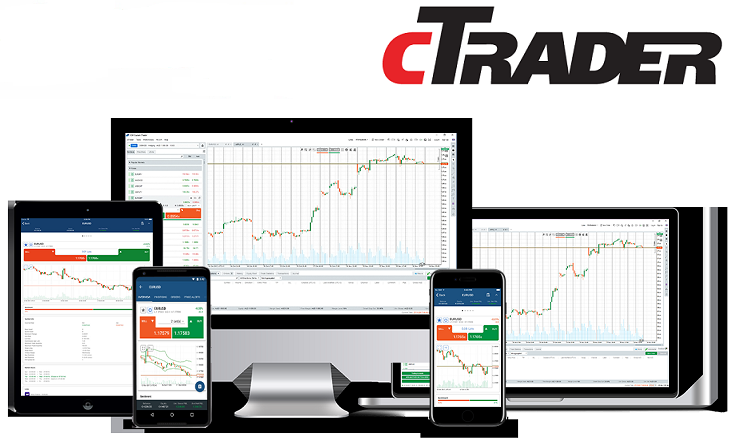
In a previous post some years back, we briefly described some of the features of the cTrader platform. However, the platform was not as popular back then as it is today because more people and brokers are starting to have an interest in exchanging computer code. As with all things, there are downsides and upsides to their use, and cTrader is no different. Therefore, we thought we would create a post that explains in minute detail everything you need to know about cTrader computer code, how to navigate around it, and how it stacks up to MetaTrader computer code. By the end, you should be able to determine whether you think this would be a good alternative for you and if you want to make the switch. (Catch up on the basics of How to trade with cTrader)
Why is cTrader becoming more popular of late?
The main reason why people are attracted to cTrader is borne out of human psychology – curiosity. Looking back through history, people have always been attracted to the latest, shiny objects; it’s how we ended up with modern technology. Anyway, for almost 2 decades, MetaQuotes has been the dominant player in the FX market, producing the most popular FX exchanging platforms under the trade name MetaTrader. MetaTrader has been the most popular exchange platform since 2004, and the release of MT4 in 2005 cemented the hold MetaQuotes had on the market. Since then, the platform has mainly remained the same in terms of design except with a few improvements over the years. In 2010, MetaQuotes even released a newer version of their exchanging platform with MT5, but even that has still not been able to outdo its predecessor. (Is It Time To Upgrade To MT5: Features Of MT5)
In the same year MT5 was released, another company entered the fray, Spotware. Founded by Andrey Pavlov in 2010, the company sought to address some of the issues traders had with the exchanging platforms of the time. He called this platform cTrader. People’s curiosity naturally attracted people to try out the new platform, even though I did very early. It took some time for people to become completely interested, but today, cTrader is a major competitor against MetaTrader. MetaQuotes boasts of having 1,231 retail entities using their computer code, and cTrader is still a long way from there. Still, there are already some major brokerage companies that offer it alongside MetaTrader. (Comparing MT4 and 5: MT4 vs. MT5)
Moreover, MetaQuotes announced at the beginning of the year that they would stop offering licenses for MT4 to FX brokers. Existing license holders would continue to have the computer code, but no additional permits would be issued. They did so to encourage brokers and traders to move over to MT5, which traders have very slowly taken up. We already mentioned the reasons for this in the previous article. This shift has created an opportunity for Spotware to step in and show what they’ve got. After all, as long as users have to consider using a different exchange platform, they might as well try something completely different from MetaTrader. This is the point where we are right now, with traders trying to look for alternatives. If you’re one of those traders interested in trying something new, how about looking around the cTrader platform? (You should know How to create an exchange strategy)
A bit of information on cTrader
The central vision behind cTrader was to create a platform that addressed issues that affected traders and to help them achieve what they wanted. Usually, once a company becomes a monopoly, as MetaQuotes did, they tend to maintain the status quo and not listen to individual input. Pavlov wanted to do the opposite, which was the main idea of cTrader. Remember that Pavlov is an active trader in the markets, so he knew what would make exchanging more effective. To achieve the vision, he hired 110 developers to work on the computer code, taking into consideration input and suggestions from individual traders, FX brokers, and banks offering FX exchange.
Through this collaboration, cTrader has become such a popular exchange platform in the eight years that it has been active. Thanks to input from banks and other liquidity providers, cTrader also has better order processing than MetaTrader. Indeed, all accounts using this exchange platform must be from the best FX ECN brokers. This ensures that orders are executed extremely fast on the interbank market without delays, slippage, etc. Add to that, cTrader doesn’t need servers in every location because brokers can use remote servers. Anyone who has ever worked with a broker whose servers are in a different locale knows how tiresome that can be. (Have you ever wondered whether: Can FX Broker Avoid Sending Trades Directly To The Interbank Market?)
There are even more advantages to using cTrader, such as the addition of new order types and order handling. For example, it is possible to modify an already active order without having to close it. Say, you wanted to close an order partially, then this is possible only on cTrader. One-touch exchange is also a big thing, as we’re going to see in the coming sections, as well as a host of new and innovative features. For now, expect to learn a lot about this terminal, and where better to start than at the beginning. (FX Rigging And Manipulation: How The Major Investors Pull It Off)
A guide to using cTrader
I know we all hate reading user manuals, but in this case, it may be better if you got a tour of cTrader. Remember, this is more than just a piece of computer code that you can tinker with until you get it right; one wrong step can cost you money or make you lose an opportunity. Furthermore, the cTrader platform is a bit more complex than MetaTrader. That isn’t a bad thing, by the way; it’s just that the computer code is very robust to cater to all the needs of traders. So, let’s start with some basics:
Where to get cTrader
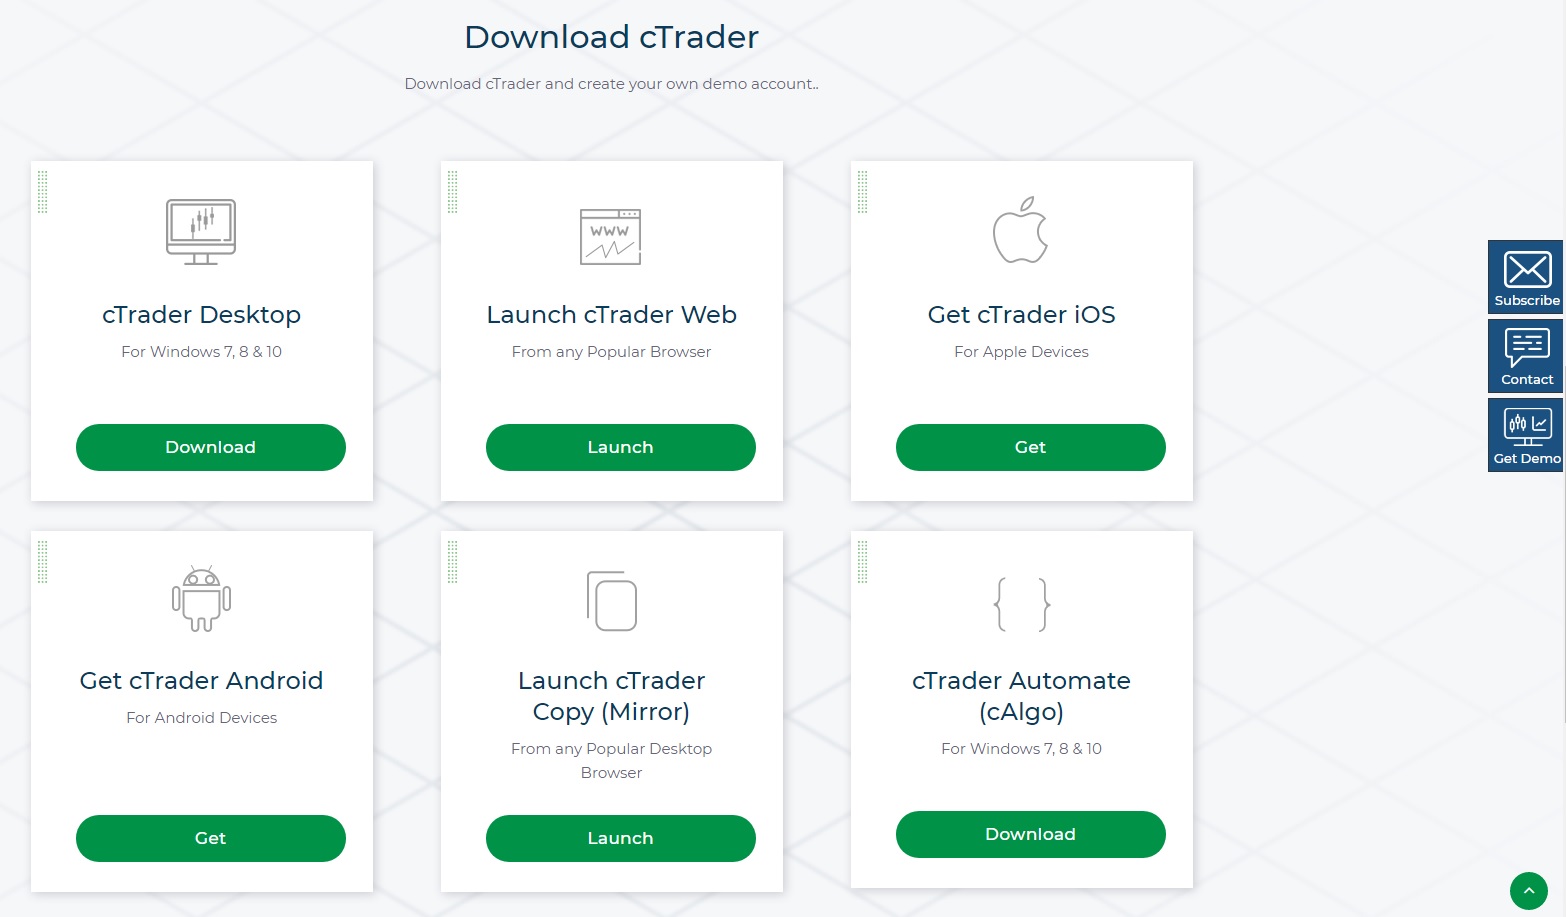
The cTrader platform can be accessed in two ways: by downloading directly from the cTrader website or by getting the software from your broker.
Downloading cTrader
Downloading cTrader directly from their website is best if you want to test the platform and experiment with its features before committing to a broker.
To download cTrader:
- Go to cTrader.com and click "Get Demo" in the top right corner.
- Provide your email address to subscribe.
- You'll be directed to the downloads page showing application versions for Windows, Mac, Android, iOS, and a web-based browser version.
This option allows you to access cTrader even if you still need to choose a broker that supports the platform. It's intended for traders still evaluating brokers and trading platforms.
Accessing cTrader via Broker
If you already have a broker offering cTrader, you can download the software directly from their website. This connects you to their live trading environment rather than the cTrader demo.
The download and installation process is the same as getting it from cTrader directly. You'll retrieve the platform version for your operating system from your broker rather than the cTrader website.
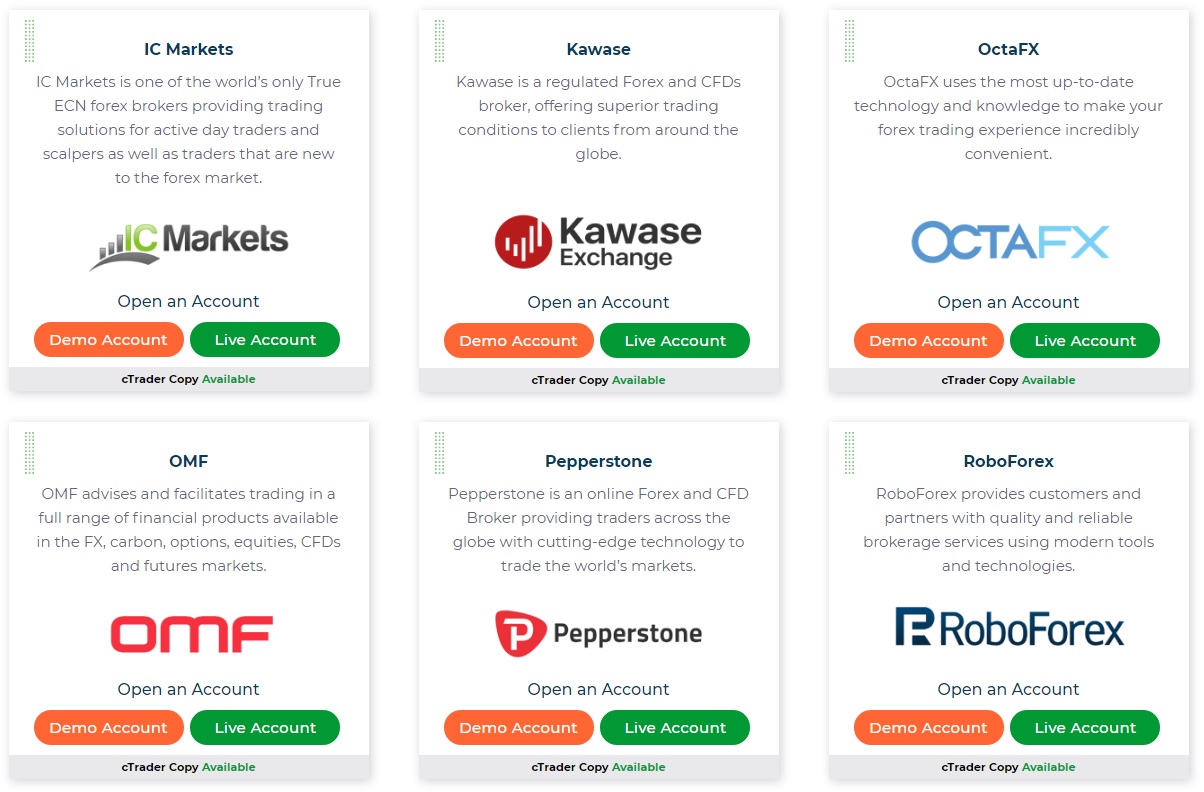
Many of the top FX brokers nowadays offer cTrader as an alternative exchanging platform, which means you can also get the computer code from the broker’s website. If you have already found such a broker, you can go to their ‘Downloads’ page and request the computer code, download, and install it on your computer.
Signing in
If downloading the program directly from the website, you must create a demo account as soon as the program is fully installed and launched. Usually, as soon as the program is established, you will be prompted to create a new account through a dialogue box like the one below. If this window does not show up automatically, you must launch it manually. On the top left corner is the menu bar, and you should click on the ‘cTrader’ button and select ‘Open demo account.’ From this window, you will enter your details and choose other options you would like to have for your account.
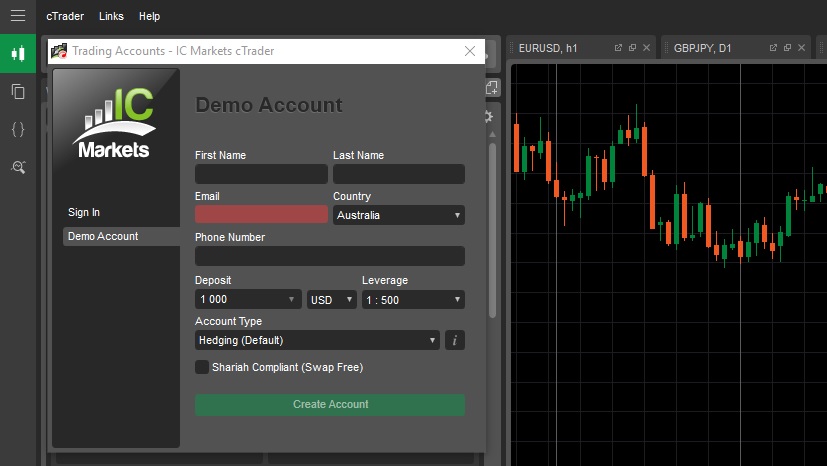
The first five are straightforward – just enter your personal information. Then, you will choose the amount of deposit, the account’s base currency, leverage, and the type you want to use. We have already covered leverage in a previous post. As for the base currency and deposit amount, it’s usually best to keep this as close to your situation as possible. If you expect to start exchanging with $1,000, keep your demo account at that amount and more if you’re going to deposit more. Although it’s not money, the idea is to train you for actual exchanging and you ought to be prepared to face the live markets. (Concepts Every Trader Should Understand: Leverage, Margin, And Hedging)
The final option may be a bit new, but that’s what Spotware does – introduce new features. Here, you can choose between opening a hedging or a netting account. A hedging account allows you to hedge, but a netting account does not. The difference will depend on the different FX regulators and their conditions. For example, hedging is not allowed in the US, but other regulators may qualify for this. According to the Head of Sales at Spotware, they added this feature to enable brokers from all over the world to use this platform regardless of the differences in regulation. Therefore, you should choose the option that mimics the rules in your location. (Some of the Laws and limits of FX exchanging in the US)
Once you have opened your demo account, you will receive the account credentials on the email you provided and can sign in and begin exchanging immediately. cTrader will also allow you to open multiple accounts with varying conditions. That means, have multiple accounts with different levels of leverage. Since you’re using cTrader to practice, you can use this option to fine-tune your exchanging strategy and find the one that works best. Finally, you will also notice that all your account(s) are synchronized to cTrader servers. You can always recover your accounts even when you re-install the program on a different computer. (The day when: ESMA Finally Puts Its Foot Down On MiFID II Regulations)
As for downloads from a broker’s repository, the signing-in process is much easier. Since you’re downloading the software from a specific broker, you can use the credentials provided by that broker to sign in to the program; no need to open another account. You can still do so if you want to, but you won’t need to unless you just want to try different specifications or account types. (Learn: How to find best Forex spreads)
To confirm that your account is active and connected to the corresponding server, the terminal will show a green indicator toward the bottom left corner of the platform. Alongside the green dot will be the current active exchanging session that is active at that moment. At the moment of typing, you can see that the New York session is active. The other exchange sessions include Sydney, Tokyo, and London, and the terminal will tell you which one is currently active. This knowledge will help you better plan your exchange strategy because the exchange volume varies depending on the exchange session. Some exchange strategies take advantage of particular exchange sessions to work correctly. (Try using the Forex Exchanging Formula Based On the Most Dynamic Cross)
Setting up
As soon as you’re signed in to the cTrader platform, there are no more differences in how the program is operated, regardless of how you got it. From here onwards, the processes will be the same. The first thing you will need to do is customize the program to your specifications so that it’s more comfortable. All of the terminal’s settings are found in the bottom left corner of the program from the gear icon, where you can make changes to various aspects of the program. One thing you may want to consider initially is the interface language, which can be changed into multiple alternatives depending on what you’re most comfortable with. The language setting is found in the ‘General’ section of the ‘Settings’ window, where there are more than 20 other languages to switch to. (Some of The Best Forex Events And Expos To Attend Every Year)
Once the language is set up, the next step is to set your time zone so that the time on the terminal corresponds to the server time. This option is available from a drop-down menu after you click the button at the bottom-right corner of the terminal. There is also the option to select those email alerts you want to receive on the email you used to sign into the program. cTrader will only email you the stuff you think is most important to you. I believe all those options are self-explanatory, so there’s no need to go through each one of them individually. (This is: Why Forex Exchanging Should Not Be Treated Like A Casino)
With the basics out of the way, now you can shift your focus to the interface's look. These settings are also found in the ‘General’ section of the settings window, where you can change between a white and a dark theme. I prefer to leave it unclear as it is by default, but some may choose a light theme. It’s all about what you feel the most comfortable with. You can customize the colors even more by right-clicking on the main exchanging area to reveal a drop-down menu with many choices of color that can alter the look of everything from the candlesticks to the background, price lines, etc. Of course, these aren’t entirely essential, but knowing you have that option is good. Don’t forget that all the changes can be synchronized to the cloud, so none of your efforts go to waste even after you re-install the program on a different computer or in case of a crash.
The exchanging environment
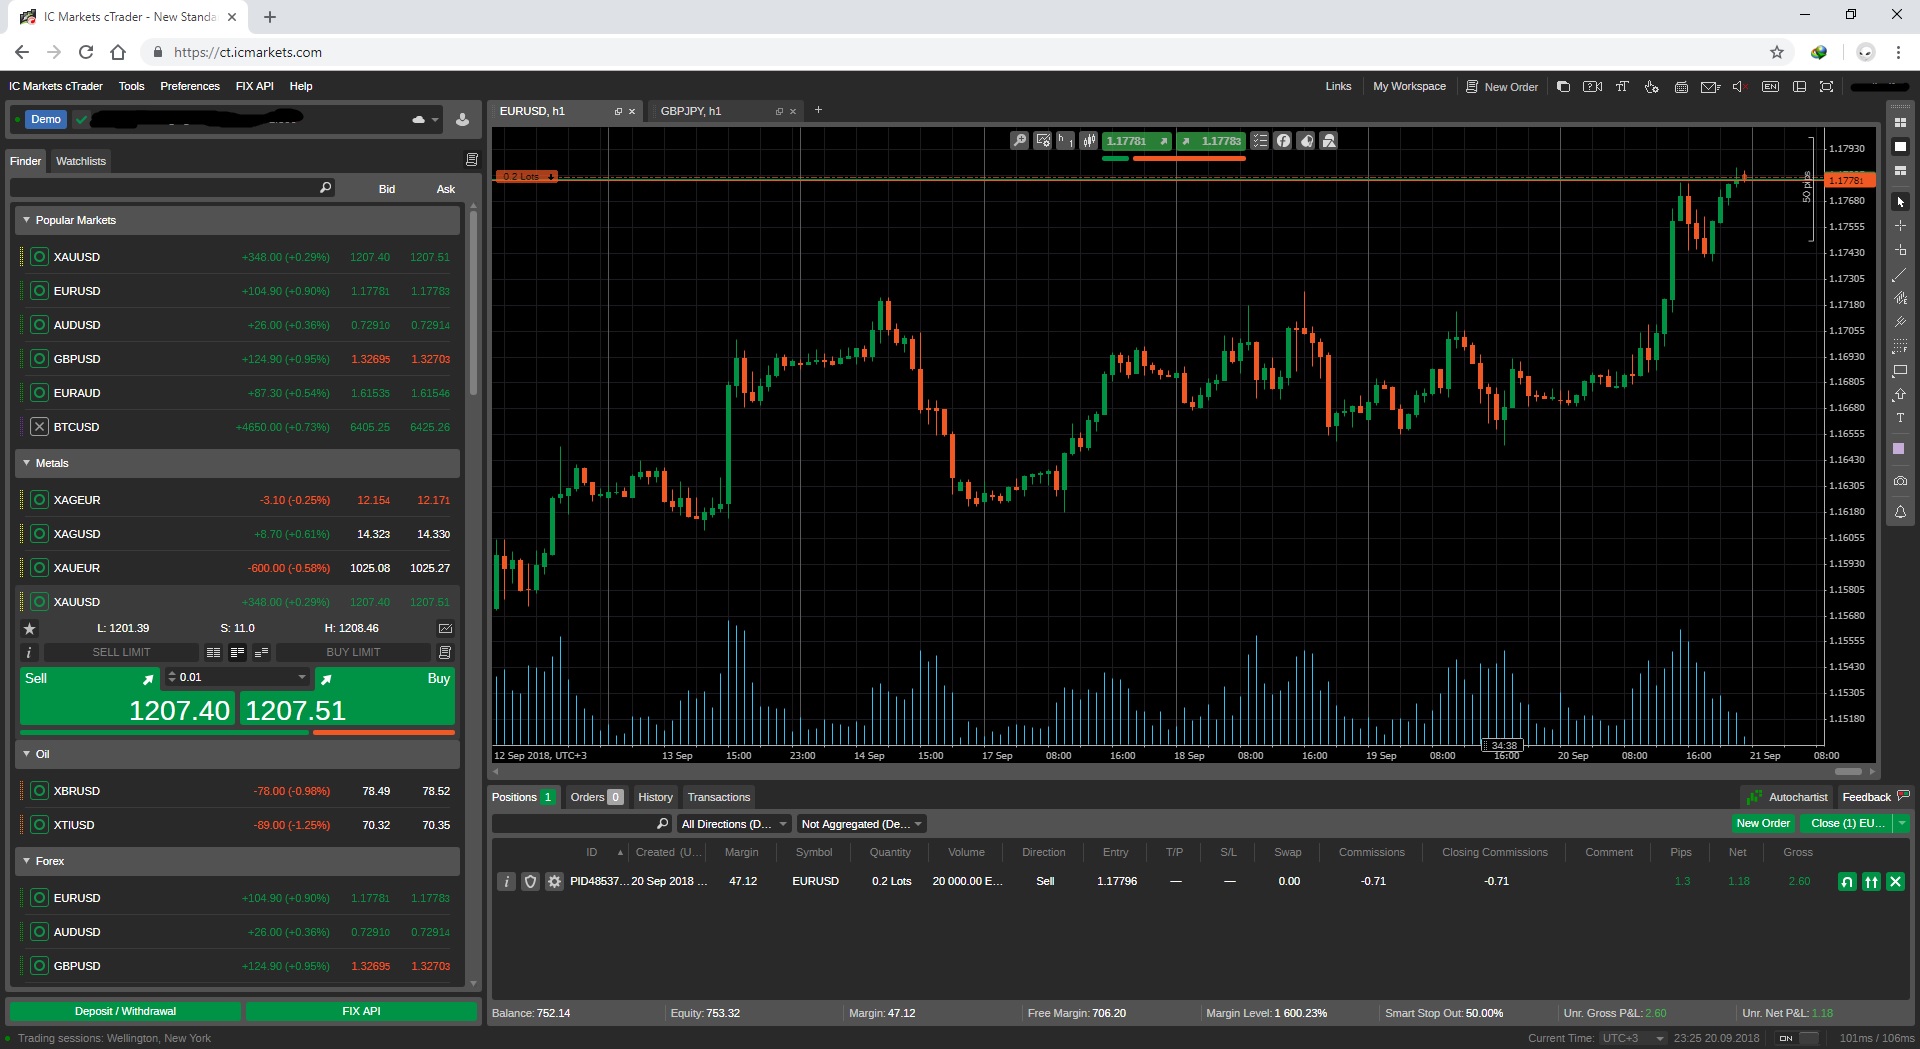
By this point, you should be completely comfortable with the interface's look because we’re not getting to the most essential part of the terminal. The exchange environment is split into the main exchange window on the right and the ‘Finder’ on the left. Let’s begin on the left-hand side with the finder. By default, this panel opens with the ‘Watchlists’ tab. This is where your favorite assets are listed, but to get them there, you first need to go to the second tab, ' Finder.’ This is where all the assets available for exchange are listed.
If you compare CFD brokers, you will see that some exchange instruments are available, ranging from metals to energies, agriculture, cryptocurrencies, etc. When using a platform like MetaTrader, your only option is to scroll down the list of assets, looking for the one you want. cTrader, as we mentioned, was meant to address the problems traders face, and this is one of them. On cTrader, you can search for the asset you want to exchange from the ‘Finder’ tab by typing into the search box, and the list will be narrowed down for you. Alternatively, you can collapse the windows because they have been neatly grouped into asset classes for more accessible locations of particular assets. In this way, cTrader makes it easier to locate whatever instrument you want to exchange quickly without wasting any time scrolling down to read everything listed.
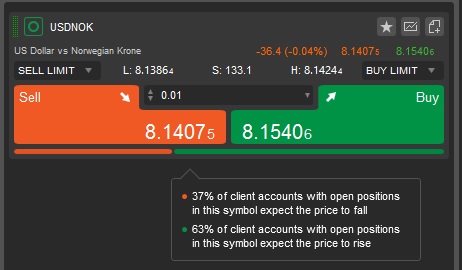
Once you have identified the asset you’re interested in, there are many ways to interact. At first, the asset is only listed as a single line showing the asset name and the bid/ask prices. There are three more levels you can expand into for more details on the asset. Click once, and the asset rises onto the first level to reveal more information about the asset, like in the image above. Now, there’s more than just the bid/ask prices because options for ‘Sell Limit’ and ‘Buy Limit’ are now available. Clicking on any of these buttons will produce a drop-down menu that shows prices to set either of the limit orders. If you remember your knowledge of limit orders, you would know that a buy limit order is an order to buy an asset after prices drop to the desired price, while a sell limit order is an order to sell after prices rise to a specific desired price. Right from this window, cTrader will suggest possible prices to place any of these orders, and that is a one-click exchange that makes the process much faster and more efficient instead of having to type in the prices manually as you would have to do on other platforms. (Every time it happens: Think Twice When Making A Deposit In A Forex Company)
You can also place your trades from this window using the considerable buy/sell buttons that are now visible. At the center, you can adjust the size of the lot you want to exchange from the drop-down menu after clicking. cTrader goes even further to tell you exactly how much margin will be required for every size of the lot available. Usually, you would have to do these calculations yourself or use an online calculator, but the platform does all that for you immediately. Since cTrader is used for ECN accounts that charge commission and not a spread, you will also know how much of a commission you will be charged. (Revealing Forex Bonuses Of Brokers: How To Identify A Real Bonus)
Finally, at the bottom are horizontal bars colored orange and green. These are the market sentiment indicators, and they tell you how other traders are leaning. By hovering your mouse pointer above these bars, a popup will appear to show more information. In our example image above, many more traders buy the USD/NOK pair than sell. Knowing this, you would know that the overwhelming market sentiment leaned toward a bullish market. Your broker provides this information depending on their client positions. In my example, I’m using IC Markets, one of the world's top brokers with millions of clients. Therefore, their market sentiment indications are reliable because they represent many traders. (Check out these: Forex market sentiment indicators)
On the other hand, if your broker only has a few thousand clients, then the information may be less reliable. Whenever you’re using this market sentiment indicator for clues on how you should exchange, ensure that your broker has a vast number of traders and that they have a considerable percentage of winning traders. We discussed how ESMA forced brokers to reveal their win/loss ratio in a previous post. That means the most reliable data can be found among brokers with the best win/loss ratio because you can be more sure that many clients are on the right side of the market.
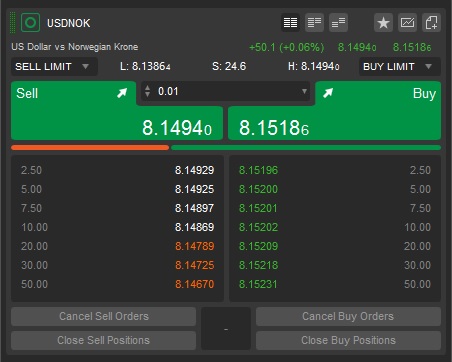
Clicking a second time on the asset name will reveal the second level where more data is unavailable, like in the image above. The only difference is that the depth of market (DoM) data is now visible. Depth of market data is used to show the level of liquidity available in the market by looking at the limit orders placed by traders. For example, take the USD/NOK that is exchanged at 8.15. If there are 100 buy limit orders once the price drops to 8.10 and 10 sell limit orders once the price rises to 8.2, you would know that many more traders think the value of the USD/NOK will increase. That is because fewer traders are willing to sell at 8.2. After all, they believe it will keep going once it gets to this price. By analyzing the DoM data, you could have even more clues about just how much liquidity there is in the markets and at what prices. (Forex Rigging And Manipulation: How The Major Investors Pull It Off)
Three types of DoM data are made available on the ‘Finder’ window for different purposes. The first is the VWAP DoM, shown in the image above. This view of DoM shows you the direction in which orders are being placed and in what direction. In our example above, you can see a lot of buy-stop orders at prices above the current ask prices. This indicates that people are expecting prices to go up and that the prices will keep going up. Such DoM data echoes the same market sentiment glimpsed from the colored horizontal bars, telling you that prices will likely keep going up. When you see this, you should also be looking for buying opportunities. The only problem with VWAP DoM is that it represents enormous lot sizes, which may not be ideal for someone with little capital. Nevertheless, it tells you where the big money is headed, and it’s often better to follow it. (This is: How Not To Be Added To The 95% Of Losing Traders)
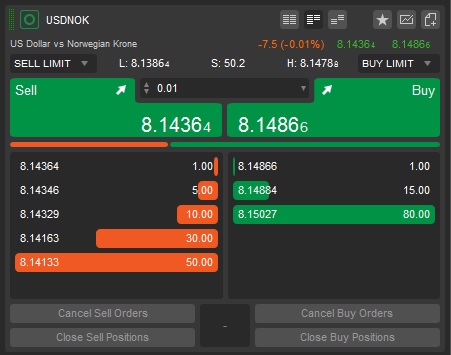
The second type of DoM window is the standard DoM, like the one illustrated above. Like the previous one, this also tells you how traders are leaning; only this one indicates smaller lot sizes. In the example above, you see again that there are a lot of buy-stop orders above the current asking prices, just like with the VWAP DoM. Therefore, you should know that even smaller traders expect prices to increase. The only difference now is that several bears are in the market, hoping prices will keep decreasing. As usual in the markets, someone has to lose in the directive for others to gain; in this case, it looks likely that the bears will lose.
The final type of DoM data seen on the 2nd level is the price of DoM. This is used to see the slightest changes in liquidity at the lowest levels. A scalper would use this information in directive to gain even a few pips from the changing tides. (These are the 10 rules of how to earn money with scalping)
All these types of DoM should be used concurrently to get a clear picture of both the short and long-term exchanging periods. A good trader should consider both because they can help you adjust your exchange strategy and plan for the future. Again, cTrader developers understood the needs of these tools and worked to integrate them into the exchange platform. Not only did they do so, but they also made it very easy to access and use the information through a one-click exchange. MetaTrader 4 does not have a depth of market, and even MetaTrader 5 does not go as deep into it as cTrader has done, which is a massive advantage for the latter.
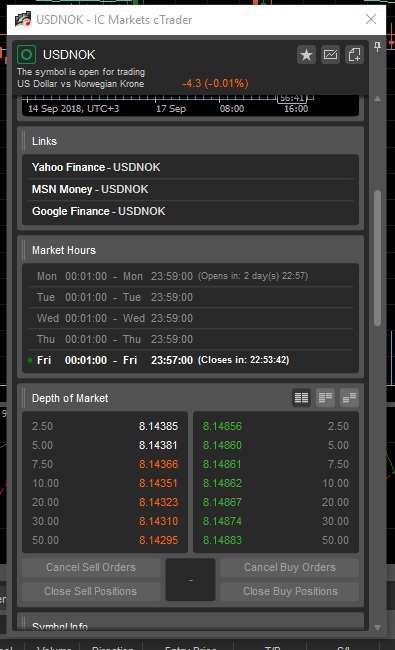
For the 3rd level of data from the Finder, you must click on the asset’s title and drag it away from the Finder, where it becomes a separate window like the one shown above. At the top, there’s not much difference because it just looks like the 1st level, but scrolling further down reveals more information. First are the links to several finance websites like Yahoo! Finance and MSN Money. Clicking on any of these will open your browser to the appropriate page to find more information and forecasts about that asset. I believe this is one instance where Yahoo! shines even better than the other two.
Further down this window, you will see additional data on the asset, including market hours, swaps, etc. All these could be beneficial as you plan your exchange strategy and want to know exactly how much risk you will take. (This is: A Complete Guide To Volume Spread Analysis In Forex Exchanging)
All the stuff described above is found on the ‘Finder’ tab on the left-side window. But even with the search box, you don’t want to be typing every time you wish to exchange a particular instrument, and that is where the ‘Watchlists’ tab comes in handy. After you have searched for whatever asset you like to trade, you can add them to a watch list and group these watch lists however you like. Right-click on the asset and select ‘Add to watchlist,’ after which you can choose a pre-existing watch list or create a new one. For example, you could have a watch list for the assets you exchange the most and another one for those you only trade occasionally. You have the freedom to do it however you want. A friend even created watch lists based on their daily volatility, like AUD/USD and USD/JPY during the morning hours and USD/CAD and EUR/USD in the evenings. That is the power of cTrader in aiding traders in achieving their goals. (Ever ask yourself: How Is Spread Betting Different From Forex Exchanging?)
The left side of the interface is very robust, as you no doubt have come to realize by now, and we’re not even done. Over on the right-hand side is the main exchanging window, where most of the exchanging and market analysis is done on cTrader. The main tools are found at the top using the floating buttons. To activate any of these buttons, you only need to hover your mouse pointer above any of them, and that action leads to a drop-down menu; there is no need to click.
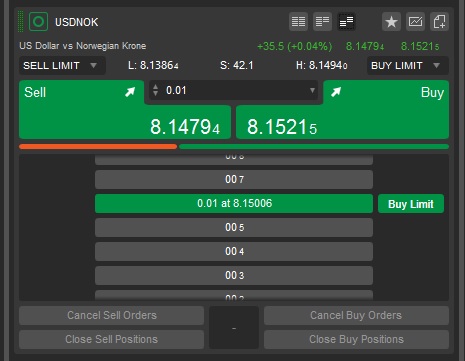
At the center are the two main buttons, buy and sell, and when you hover the mouse pointer, it reveals a window very similar to the one we saw in the ‘Finder’ tab. A lot of it is identical, but there is a considerable addition you will only notice when you hover the pointer a bit lower below the actual buy/sell buttons. When you do so, you will see a pop-up like the one above, this one for placing buy/sell limits and buy/sell stops.
The displayed pop-up explains precisely how it works – you drag either the orange limit directive or the green one. The orange one represents the sell limit and sell stop – if you pull it above the current bid price, it is automatically a sell limit, but if you remove it below the current bid price, it becomes a sell stop. For the green one, it can become either a buy limit or a buy stop – when dragged below the current ask price, it becomes a buy limit, but when carried above the current ask price, it becomes a buy stop. This may seem complicated at first, but it is a very intuitive tool that any trader would appreciate having because it lessens the burden. If you had to place such limit orders on, say, MetaTrader, that would require manual input of prices. Here on cTrader, you can do it just by dragging your mouse and even modifying these pending orders after the fact with just a little effort and precision. (GDPR Is Finally Here! All You Need To Know And How It Affects You)
The buttons to the left of the buy/sell buttons are mainly for setting up the stage. To the far right are buttons for zooming in and out, although you can also do it using a mouse with a mouse wheel. A button for saving templates specific to the exchanging window follows it. We mentioned earlier that cTrader synchronizes your data to the cloud, but that is about general data on the look of the terminal, accounts, and watch lists. This ‘Template’ button can launch specific indicators you use. For example, I like to use moving averages alongside the RSI indicator – that can be one template. When I use trend lines, on the other hand, I want to have an oscillator like the stochastic to confirm my suspicions – and that can be a second template. Therefore, I don’t need to keep adding indicators whenever I want to use a different strategy. Even more, you can save the indicator's specific values the way you would like to use them. (Find out more about this: Forex Exchanging Strategy Based On A Fakey Pattern)
Still to the left of the buy/sell buttons, the following button switches between display modes. You can use candlesticks, line charts, bars, or dots. The most common are the first two; I’ve never understood why developers even bother with the other two. Candlesticks are of obvious value because they show exchange movement throughout the exchanging period, while line charts can be used to simplify the charts and highlight support and resistance levels. I have nothing to say about the other two – feel free to enlighten me in the comments section below.
Then, finally, to the left is your choice of timeframe. You will notice that there are many more timeframe options here than you would typically find on MetaTrader, and that was meant to increase the trader's flexibility. You also have the option to illustrate the charts in the form of ticks rather than time, and this is a new concept. Using ticks instead of time can display pivot point levels more clearly, similar to Renko charts that take away the time concept and focus on the price. Of course, you must know how to study these charts because they can be overly simplified without time consideration. (Do you know: What Is The Future Of Cryptocurrency In Finance?)
The main tools are to the right of the central buttons, starting with the ‘View Options' button. When you hover your pointer above this button, a drop-down of attributes on the exchanging window appears. You can use these to change the way the window appears by adding or deducting certain tools from the window. Then there are the indicators. Unlike MetaTrader where you drag indicators onto the exchanging window, on cTrader they are listed neatly in a drop-down menu. Once you select a particular indicator, a settings window appears from where you set the parameters of the indicator. (All about Using the Martingale System As A Forex Exchanging Strategy)
A' More Indicators' button is at the bottom of this button’s menu. If you click on this, you will be directed to the cTrader website to download additional custom indicators. You see, the developers of this platform knew that people like to develop and use custom indicators, so they made the process even easier. To add a custom indicator on MetaTrader, you have to download it, copy it into the MQL4 folder, and then refresh the entire program. On cTrader, you only need to download and run it, and it is automatically added to the list of indicators. Nifty, right?
The last two buttons here are used to modify the terminal's looks and remove added indicators. Even such simple tools have been made very efficient on cTrader because they are very easy to get to and very well organized. Many of these same tools are available on the main exchanging window when you right-click on it, except perhaps a few additions like ‘Chartshot’ which you can use to take a screenshot of the exchanging window and share. There is also an option to set price alerts at particular prices. That may be useful if you’re looking at multiple charts but still want to know when prices hit a certain level in a specific chart. (Investing In Cryptocurrencies: Watch These 5 Profitable Cryptocurrencies)
Finally, on the exchanging terminal, you have a window for all your open positions, pending orders, and previously closed positions. This is probably where you will place a lot of your attention, so we’re talking about it last. Perhaps that is because this is just a report card, and the work is done in the previous two windows. On second thought, there is still some work to be done here.
Managing trades
Even after you have placed your trades, that doesn’t mean there’s no going back because cTrader gives you tools to manage your open trades precisely. If you already have an open stance, right-click on it and select ‘Modify stance,’ which will produce a window like the one above. From here, you can make changes like closing your stance partially or changing the direction of the exchange. You may need these tools in a pinch whenever you're exchanging, and here they are. You may need to modify your stance if perhaps you want to manage risk or take some profit without closing the stance entirely. As for reversing a stance, that can follow an exchange as it dips and peaks within a range. (Learn some: Breakout exchanging strategies)
That covers everything you need to know about finding your way around cTrader. Even though the company may still issue some updates, these essential tools will remain the same. For anyone interested in trying cTrader, these should be all the tips you need. Yet, we’re still not done because there are some advanced features you may want to check out.
Advanced features of cTrader to try out
So far, we have covered all the basic stuff you will use daily. But the features available don’t end there, as some other advanced features may be handy. Don’t worry; they aren’t far to get to; click on the three horizontal lines at the top-left corner to reveal them. They are:
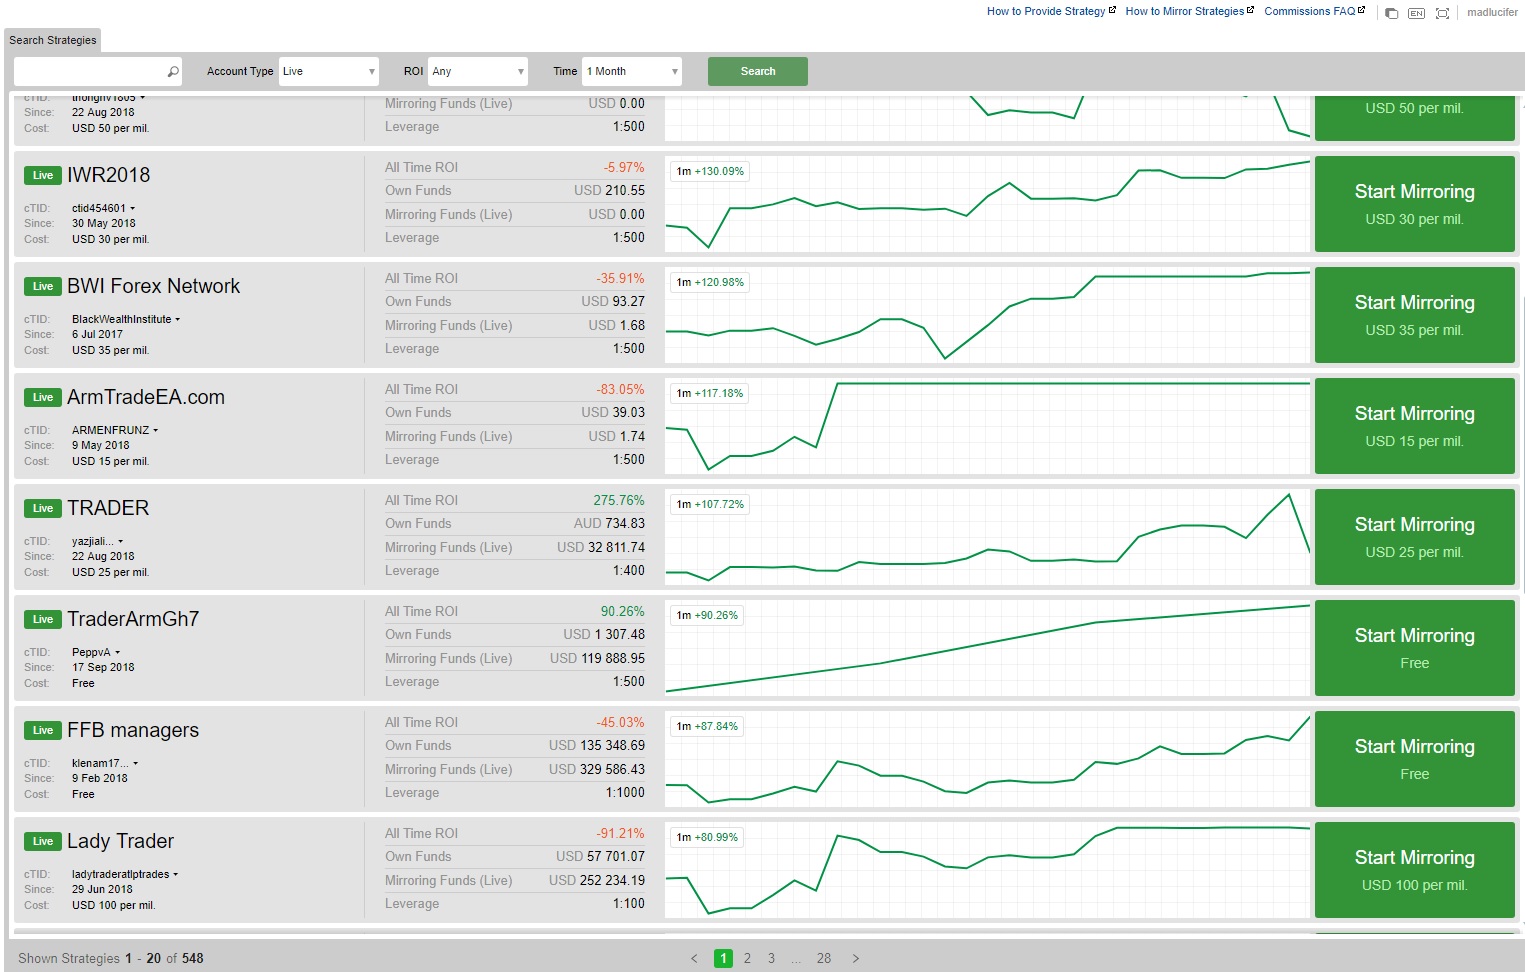
Copy exchanging
In a previous post, we remarked on how much social exchange has grown over the past decade and how beneficial this feature can be to traders. For amateur traders, it can be a way of investment. At the same time, you learn the ropes, and even seasoned traders can earn extra income either by getting paid for the service or just dedicating a portion of their capital to copy-exchanging. Either way, cTrader developers have been included regarding copy exchanging. When you click the ‘Copy’ button on the cTrader terminal, you will be redirected to the mirror website, which is cTrader’s copying site. From there, you will find a page similar to the one above. You can tell that there are a lot of traders to copy from because there are over 500 of them. (Do you know: Who The Best Forex Social Exchanging Brokers To Work With?)
Many of them are paid services, but some are free. To determine if a particular service will be profitable, click on the name of the service and check out its historical performance. The most crucial factor is ensuring they have a long history of positive performance; many good performers are usually newcomers who only started exchanging recently. Their success may have just been the result of beginner’s luck, but the genuinely reliable services have been around for a long time. It’s also advisable to select services that use ‘real’ accounts instead of demos because they are incentivized not to lose money like a demo account. (Find out How to find reliable exchanging signals)
Anyway, when you click on the ‘Start Mirroring’ button, you will be asked to sign in with your cTrader credentials and select the account that you want to mirror the cMirror service chosen. You can choose a live or demo account, although it’s always better to try out a new service first on a demo account. Then, when you have ascertained that they are consistently profitable, you can start mirroring the trades on a live account. (Some of the Best tips on working with Myfxbook)
Another factor to remember is the proportion of your capital you dedicate to the service. For example, if you allow the service to utilize up to 50% of your capital, you cannot lose anymore. However, if you enable the service to access your entire account, it can be wiped out. Some people go even further to allow even more than the account’s capital, and that is the most dangerous because you can lose even more than you had deposited and end up owing the broker money. If you’re unsure how much to allow the cMirror service to access, always err on the side of caution unless you’re very sure about the service itself. Also, think about your risk appetite because, in the end, that is what matters. (Here are the five tips for opening a PAMM account in the US)
Once you have activated a specific service, it will appear below the account you selected for it. After you return to your exchanging terminal, you may begin to see the trades initiating, but that depends on the selected service. Some services only make a few trades a week, while others make plenty even in a day. Just remember that you are still in control of your trades, even though the mirror initiated them. If you find a particular exchange to be incorrect, you can always close it and open another one manually. (Do you know: How easy is it to exchange Cryptocurrency in the Forex market?)
Automated exchanging
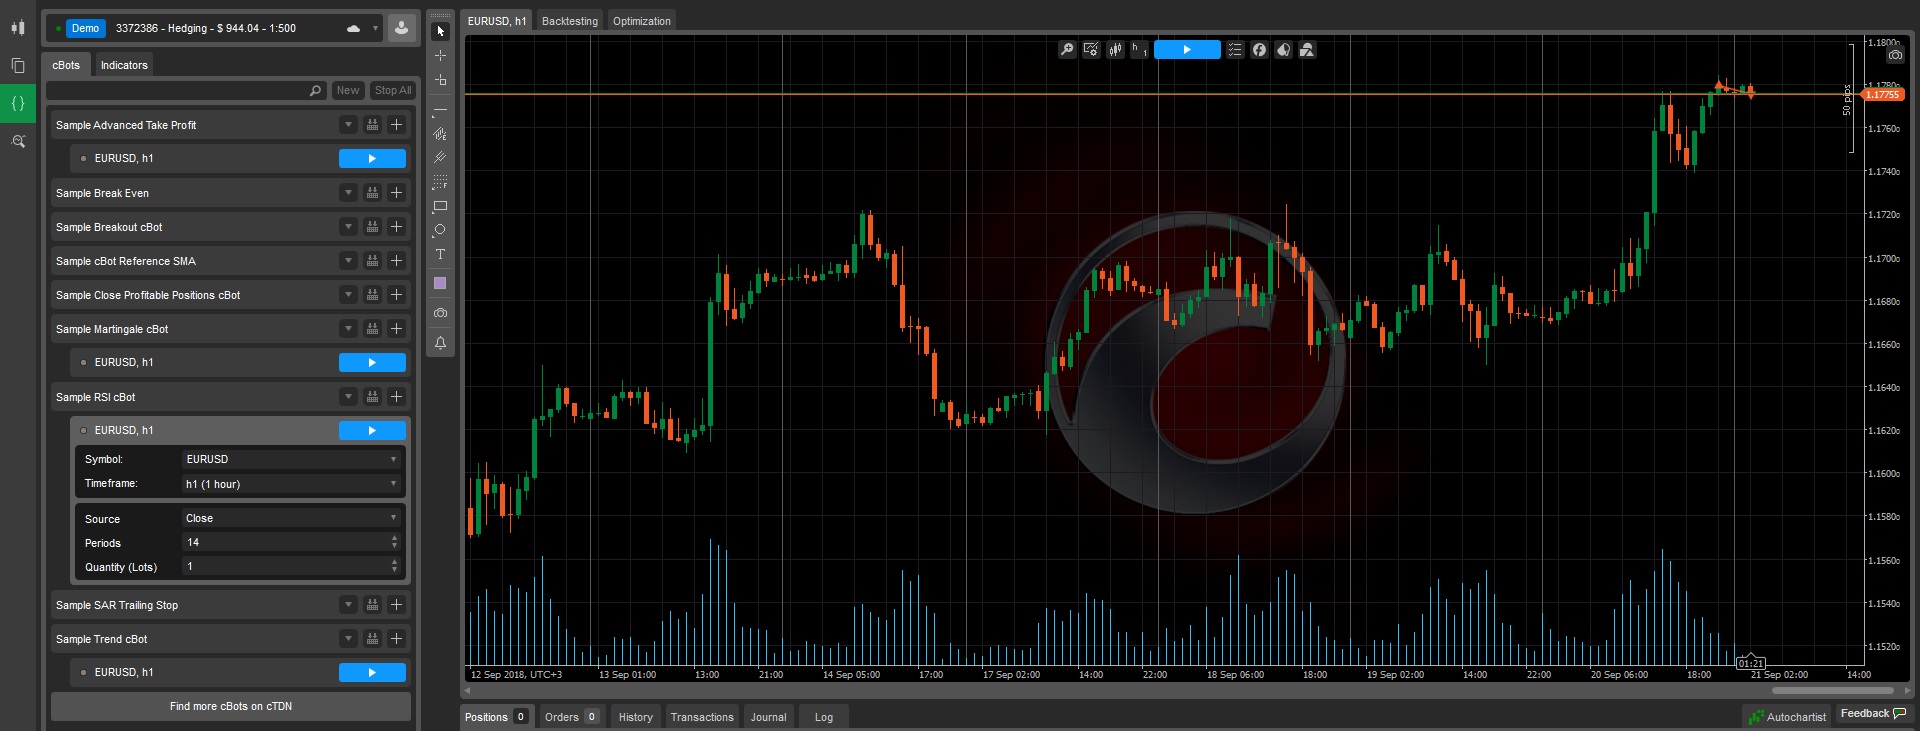
Besides social exchange, people also use robots to exchange the markets, and cTrader has coined these robots ‘cBots.’ This is the second tool from the advanced arsenal in cTrader, and it looks like the image above once selected. Right off the bat, you can see a lot of tools in this feature. On the left are some preinstalled robots that come with the exchange platform. To see how you can use this feature, let’s try one. I like using the RSI indicator, so let’s use the ‘Sample RSI cBot’ as an example. (You should learn Learn How Cryptocurrency Scams Operate And Avoid Them)
To launch the cBot, click the plus (+) button beside its name and select the currency pair you want to try. Then, to activate, click on the play button in blue. Before we even get to that point, it’s always essential to backtest the robot and see how it would have performed in the past. The best results usually take data over a long time, but since I’m just running a quick test, I’ll backtest over the past month (this is just an example). When you’re serious about a robot, go back as far as possible, depending on the time you must wait. By the way, you can set the time limits of your backtest from the dates on either side of the exchanging window… sort of. There are also other settings you must specify, like the tick data and spreads, to be used during the test. Actual spread data is the most accurate, but you can run a quick test by opening or closing prices. Once again, always use the most accurate data when running the tests if you’re seriously considering a robot, especially one downloaded from the internet. (This is: How to launch an expert advisor on MT4)
After running the RSI cBot, my account ended up being halfway down, having lost a little over 50% of my capital, so suffice it to say I won’t be using this robot ever again. Imagine if I had not done a backtest and rushed to implement it on a live account. Never run a robot on a live account before you perform extensive backtests and forward tests. Then, let it run on a demo account for a while… unless you feel sufficiently philanthropic to throw away your money. (These are the Top 10 Most Outrageous Forex Market Scammers)
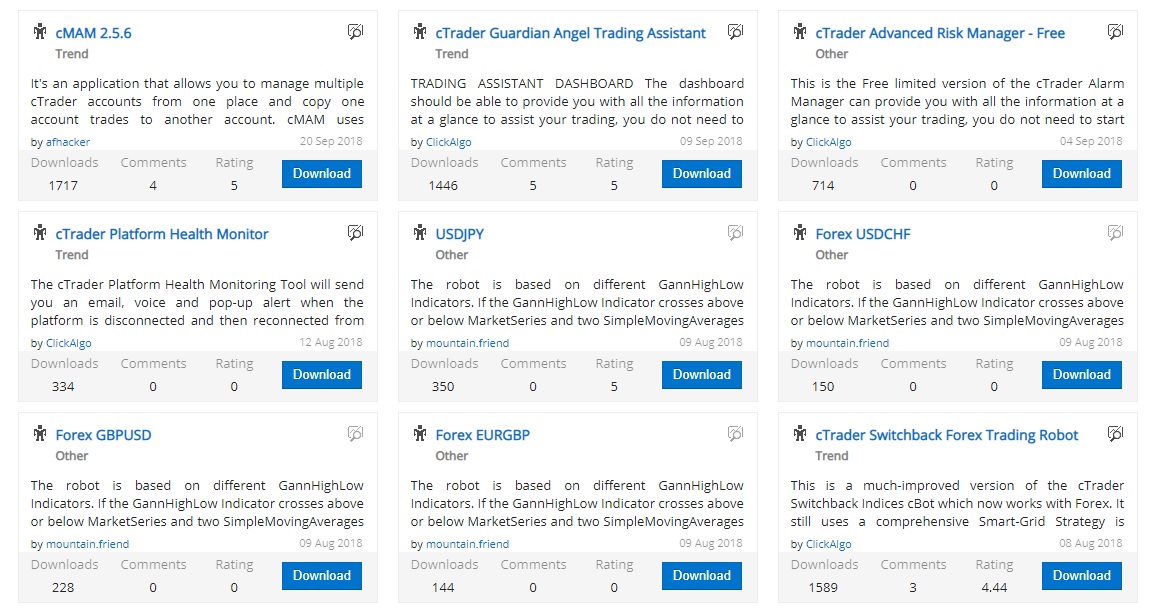
Regarding downloads, toward the bottom left is a button for finding more robots besides those already preinstalled. When you click this button, a webpage opens with a list of robots like the ones shown above. Just like with copy exchanging, all you need to do is run the downloaded file, which will automatically be added to the cTrader terminal. From there, you can run all the tests you need to ascertain whether it performs as advertised. I just remembered that I had to remind you to read the information presented alongside the robot itself. The robot developer often includes clues and tips on using the robot and what to expect. Remember to go through this, too, because there may be some additional information you may be ignoring. (Lessons on self-defense: Forex scams)
Some of us are very good at coding, and cTrader will allow you to do your magic by modifying any robot to your specifications. That means you do not have to suffer a losing robot when you can correct its code. You can even build your robot if you’ve got the chops and sell it on cAlgo – another way to put your skills to good use and make money doing it. I’m not much of a coder, but looking at the code in cTrader robots alongside that of MetaTrader’s seems a bit less complex, perhaps because of the coding language. Maybe someone could help me refine the RSI cBot to produce better results – that’s an idea. (Get information from these: Sources of Forex exchanging information)
Analysis
The final feature from the advanced section is the ‘Analyse’ tool. I wouldn’t call it an advanced tool, though, because it’s just a page showing the statistics for your account. Also, you can compare our comprehensive review of ActivTrades Trading Tools. This is the place to come over the weekend to find out what made you lose or make money, then plan for the coming week. Forex exchanging is about constant growth, and the only way to do so is by constantly learning from your mistakes and working to correct them. (Do you know What The Financial Commission is, and can it be trusted?)
Partnership
Do you ever want to be more than just a trader? cTrader can help you achieve your dream by going to this section. If you’ve got a live account, you can become an introducing broker through cTrader. When you click on this link, your request is sent to your broker requesting a partner status, which, in effect, makes you like a broker. With the partner status, you can sign up clients, and their trades are routed to your broker. Ultimately, you will get a piece of your broker's commission – it’s just like being a broker, only without the resources. All you will need is to solicit clients online. (How Do You Know An Expert Advisor Is Out Of Date?)
Web trader
cTrader isn’t only available when you download it to your computer; it can also be accessed from the web browser. When you open the web-based version of cTrader from your browser, a lot of the interface looks similar to that of the installed platform. The image below exemplifies what you can expect from the web-based terminal.
As you can see from first sight, there isn’t much of a difference, but the differences become glaring when you consider some of the lacking features. The first difference is visible on the right side window where the exchanging windows are displayed. On the installed program, dragging pending orders from the one-click exchanging terminal onto the main exchanging window is possible. Unfortunately, this feature is not available on the web-based version of the platform. Besides that, there isn’t anything different about the interface or exchanging features. (We asked ourselves: Will Cryptocurrencies Recover From Their Price Slump In 2018?)
On the other hand, none of the advanced features described above are available on the web-based version of the program… at least not directly. If you want to use any of the advanced features, you must visit the cTrader website by opening a new tab and activating it. Say you wanted to copy trades. Then, you must go to the mirror website and select the trader you want to copy. Only after signing in to your cTrader account would you be redirected to the web trader. As for exchanging robots, these aren’t available on the web-based version of the platform. You have no option but to activate and manage these from the downloaded program.
You’ll also dislike that you can’t apply the workspace you saved from the computer program on the web trader. You won't be able to see any of all those quirky colors you had created and synchronized and the windows you had lined up with the technical indicators ready to catch exchanging opportunities. Sorry. You will have to live without that when trading from the web trader on the go. (Simple Day Exchanging Strategies You Can Use In The Forex Market)
Despite these shortcomings of the web trader, no one can argue against its utility. Imagine yourself away from your exchange desk but still wanting to place an order. Or you receive an email alerting you that you have just received a margin call. Using the web trader, you can quickly log into your account, manage your trades from any browser, and avoid losing too much money. Besides, you won’t notice a massive difference because the two seem similar in appearance and have most of the essential features you need to make quick orders. This is a perfect addition by Spotware because not many other Forex brokers provide a web-based version of their exchanging platform, and neither does MetaQuotes. Therefore, cTrader is head and shoulders above its competitor and a much more reliable choice. (Which Are The Most Influential Cryptocurrency Markets By Country?)
How does cTrader compare to other platforms?
Now you know all the features available on cTrader, it shouldn’t be difficult to point out how many aren’t available on platforms like MetaTrader. The differences are glaring, right? Just to be clear, this was not a post to glorify cTrader only, although I have to admit I’m a huge fan. This highlighted the changing tides in the Forex industry regarding exchanging platforms. There is no longer a monopoly like MetaQuotes, and traders must know their options. As a trader, you should also be open to new ideas and tools instead of being close-minded, which may cause you to miss many opportunities. Therefore, the next time you see that link asking you to download cTrader, don’t ignore it; try it. You may like it.
 GermanyUS